Face recognition can be a nice way of adding presence detection to your smart home. A simple camera at your front door could detect who is home and trigger certain automations in Home Assistant. However, with all camera-based systems, this comes with a risk for user privacy. How are camera feeds processed? Are images stored? Is it easy to disable processing?
Most available out-of-the-box solutions use cloud-based or closed-source approaches. With something as face recognition, I want to have more control before I would consider adding it to my smart home setup. Given this, I was interested in whether I could set up such a system entirely local instead, without any reliance on external cloud services. In this series, I show how to build a face recognition system that can nicely integrate with Home Assistant for presence detection.
Given the large size of this project, this will span multiple posts. This first post lays down the groundwork with, at the end, a functioning face detection system.

Requirements for local face recognition
Before setting up this system, I made a list of requirements that should be met. There are many possible approaches/solutions, so a list of requirements can guide the design choices.
- ✔️ No cloud needed.
- Any solution should not require an internet connection to a cloud-based service.
- ✔️ Local processing.
- All image processing should be done locally on a machine that I control. I do not want to upload images to a server or service out of my control.
- ✔️ Easy to disable.
- A recognition system should be easy to disable. For example, I want to automatically disable any processing when the house is in “guest mode” (i.e., guests are present).
- ✔️ Pre-trained models.
- I don’t want to train a face detection model from scratch. To do that would require a lot of time and a well-curated training set. Of course, for the face recognition part, we will need to have a training phase. But, face detection should be doable with a pre-trained model.
- ✔️ Private training set.
- Any images that are needed to train the face recognition system (e.g., my face), should also be stored locally. I don’t want to upload a training set to a cloud service.
- ✔️ Open source.
- The source code should be open so that it can be inspected. This also increases the chances that the project will still work in the future.
- ✔️ Free / no-subscription needed.
- While there is nothing against paying for software, for this experiment, I want something that can be used without a subscription. To make sure that the system will work in the future, I especially don’t want to be dependent on an external service. There are many face recognition systems available that are free to use, but companies can decide to end support or introduce new pricing models.
Luckily, meeting all requirements is possible! But, it does require some programming to set everything up.
Choosing a recognition system
During my search for face recognition systems, I found several systems that could be used. Some of these are cloud-based, others are local. A non-complete overview can be found below. I wasn’t able to test all methods myself, so I used information from the docs. Found a error in the overview above? Let me know! The requirements score is based on how many of the requirements the solution meets.
| Solution | Examples | Internet needed? | Pricing / subscription | Training data | Processing (inference) | Requirements score |
|---|---|---|---|---|---|---|
| Cloud solution | Yes | Pay-per-use with free starter plans | None1 | Test images are uploaded | 2/7 | |
| External service, local processing | No3 | Free with limits / unclear | None1 | Test images are processed locally, but often closed-source | 5/7 | |
| Local, self-trained |
| No | Free3 | Database with faces | Local, full control | 6/7 |
| Pre-trained, local processing | No | Free3 | None1 | Local, full control | 7/7 |
2] Some of these systems have keys which mean they have to phone-home at some point.
3] Free as in "no money." You still have to pay with your own development time of course.
Based on this overview, I chose to go for one of the libraries that has support for pre-trained models and supports local processing: face_recognition and face-api.js. face_recognition is written in Python and uses the dlib library as a backend. face-api.js runs on Javascript/Node using TensorFlow.js as the backend. Both projects have support for face detection and recognition, with pre-trained models.
In the end, after a lot of testing, I chose face-api.js. I always wanted to experiment more with TensorFlow.js, and, given that I use python during my day-job, JS would be a nice change of scenery. If you are more interested in a pure-python setup, make sure to check out face_recognition. Note, that even though we will set everything up in JS, the actual processing is done in C++ using the Tensorflow bindings.
Hardware requirements
At the minimum the face recognition system should have one camera and something that can run the algorithm. In my case I use the following:
- Raspberry Pi 3B+ connected to a Raspberry Pi Camera. This is used as the main camera system. I use motionEyeOS as the OS on my Pi.
- An Intel NUC8i5BEK that will run the face recognition system (and also runs Home Assistant).
Of course, any other combination can be used. Just make sure that the camera has an URL where you can retrieve an image snapshot. Ideally, the camera also has built-in motion detection so that you can trigger face recognition at the right time. The compute unit that runs the algorithm should be strong enough, or you can expect a delay in processing. I haven’t tried this on a Raspberry Pi, let me know how it performs if you try it out!
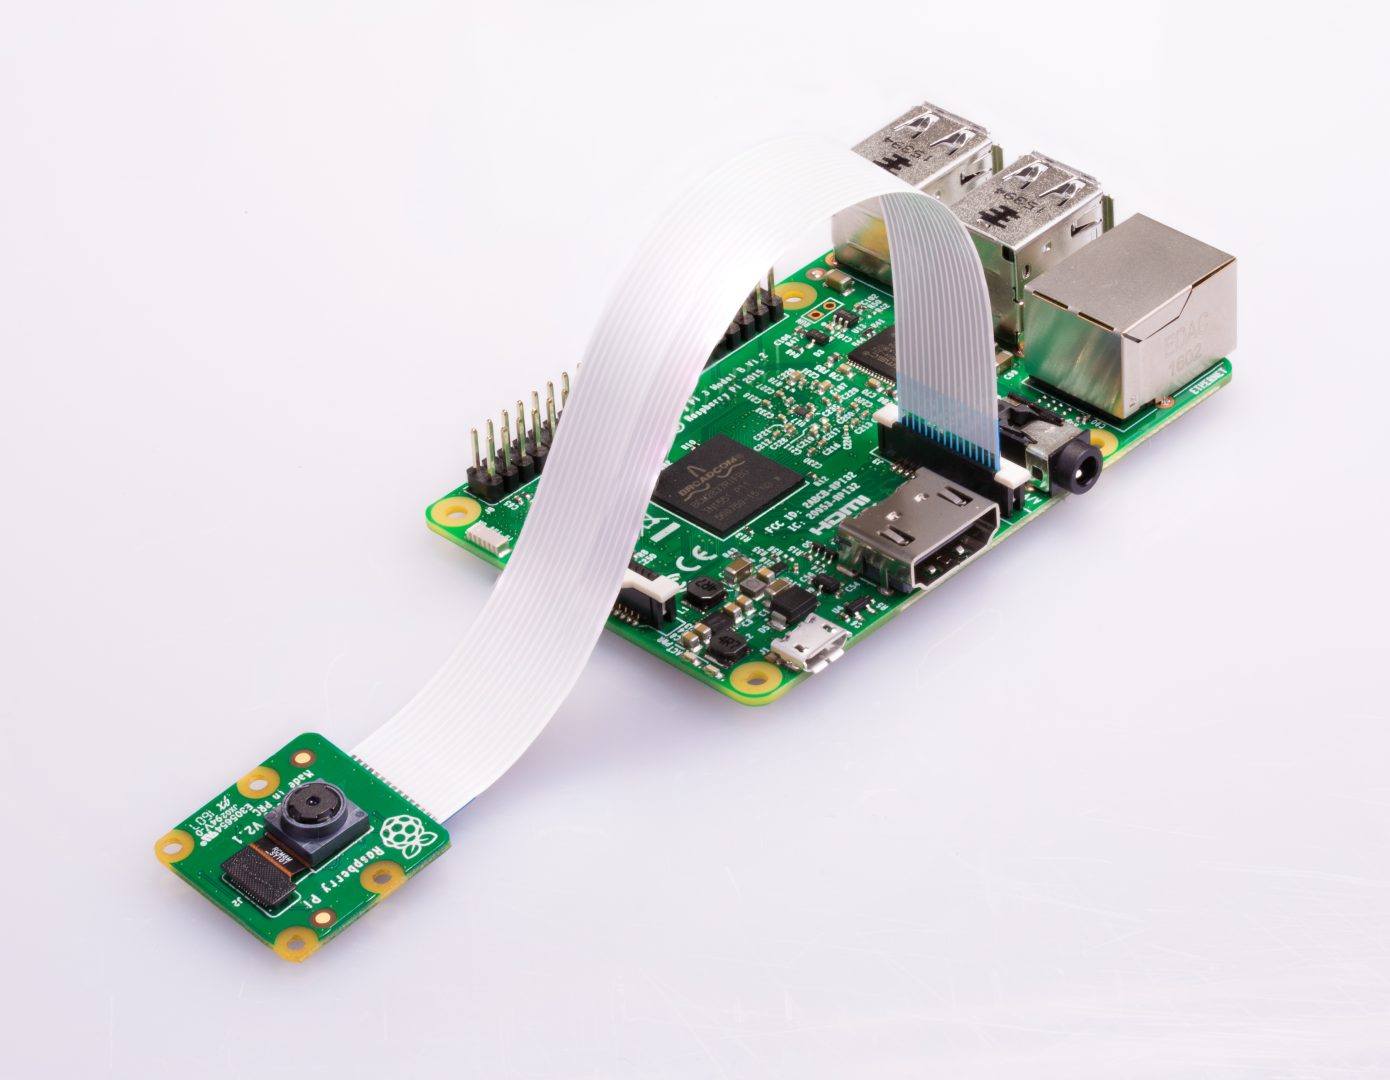
For this project I use a Raspbbery Pi in combination with a Pi Camera. Image from https://projects.raspberrypi.org/en/projects/getting-started-with-picamera
Part 1: Building a face detection system
In this first part of the series, we set everything up for simple face detection. The overview of the application is shown in the figure below. A camera, in my case a Raspberry Pi Camera, sends a request to the application when it detects motion. This is done using a simple HTTP GET request. You could also trigger this from Home Assistant using an automation triggered by a motion sensor, for example.
Upon receiving the webhook, the application retrieves a snapshot from the camera, e.g., the last recorded frame. This frame is processed using the detection algorithm. If a face is detected, we can send a request to Home Assistant that something was detected. Additionally, we save the snapshot with a bounding box around the face. This image can be viewed by us (the user), for example, through the Home Assistant dashboard.

Overview of the face detection system.
The full source code for part 1 can be found on the ha-facerec-js GitHub repository (v0.1.0).
Setting up the webhook
To listen for a request from the camera (the webhook), we set up a simple express webserver. The server listens for requests on the /motion-detected endpoint.
import express from 'express';

// Initialize express
const app = express();
const PORT = process.env.PORT;

// Start express on the defined port
// Start express on the defined port
app.listen(PORT, () => console.log(`Server running on port ${PORT}`))

app.get("/motion-detected", async (req, res) => {
  // Send a OK back to the camera
  res.status(200).end();

  // Do something here

});
To trigger this route, go to your MotionEyeOS admin panel and enable motion detection. Add the URL of your running express instance under “webhook URL.” Most probably, this is <ip of your machine>:<port>.

Setup the webhook in your camera’s control panel.
Running face detection
After motion has been detected, we can start looking for faces. To do this, we request the last frame of the camera. Using node-canvas we can make use of the Canvas functionality within Node.js (normally only possible within a browser). Loading the image becomes as easy as calling the URL of the camera (here defined using the CAMERA_URL env variable):
import canvas from 'canvas';

// From inside an async function:
const img = await canvas.loadImage(process.env.CAMERA_URL);
With the image loaded, we can pass this to the face-api.js library to actually detect faces. For this, I make use of the SSD MobileNetV1 network included with the library. This network has good performance in detecting faces but is a bit slower than other alternatives. Luckily we can speed this up later; see the next section for more info.
The network weights are loaded from disk, and all processing is done locally on the device. The weights of these networks are stored in the Github repository for you to download.
// Load network from disk
await faceapi.nets.ssdMobilenetv1.loadFromDisk('weights');

// Detect faces
const detections = await faceapi.detectAllFaces(img, new faceapi.SsdMobilenetv1Options({ minConfidence: 0.5 }));

// Create a new image with a bounding box around each face
const out = faceapi.createCanvasFromMedia(img);
faceapi.draw.drawDetections(out, detections);
With faces detected, we can perform our actions. For this example, I save the snapshot with the detected faces to disk:
fs.writeFileSync('public/last-detection.jpg', out.toBuffer('image/jpeg'));
The exported image can later be retrieved using a new route in Express. You could, for example, show the last detected face in your Home Assistant dashboard using a camera setup.
Speeding up recognition
The MobileNetV1 network is quite slow when we run it in Javascript. Luckily, there is a special package that offers Node bindings for the Tensorflow C++ backend. Using this package drastically speeds up the detection. Using these bindings is as simple as loading them in the script:
// Load TF bindings to speed up processing
if (process.env.TF_BINDINGS == 1) {
    console.info("Loading tfjs-node bindings.")
    import('@tensorflow/tfjs-node');
} else {
    console.info("tfjs-node bindings not loaded, speed will be reduced.");
}
Note: The bindings don’t always work out of the box in my experience. If you encounter errors, first try to run everything without the bindings loaded.
Tying everything together
Combining all snippets from above results in a simple web server that can detect faces on command. I run this server inside a docker container as part of my home automation docker setup. You can find the Dockerfile on the GitHub repository. The full source code of the script is as follows:
import express from 'express';
import faceapi from "face-api.js";
import canvas from 'canvas';
import * as path from 'path';
import fs from 'fs';

// Load TF bindings to speed up processing
if (process.env.TF_BINDINGS == 1) {
    console.info("Loading tfjs-node bindings.")
    import('@tensorflow/tfjs-node');
} else {
    console.info("tfjs-node bindings not loaded, speed will be reduced.");
}

// Inject node-canvas to the faceapi lib
const { Canvas, Image, ImageData } = canvas;
faceapi.env.monkeyPatch({ Canvas, Image, ImageData });

// Initialize express
const app = express();
const PORT = process.env.PORT;

// Start express on the defined port
app.listen(PORT, () => console.log(`Server running on port ${PORT}`))

// Webhook
app.get("/motion-detected", async (req, res) => {
  res.status(200).end();

  // Load network
  await faceapi.nets.ssdMobilenetv1.loadFromDisk('weights');

  // Request image from the camera
  const img = await canvas.loadImage(process.env.CAMERA_URL);

  // Detect faces
  const detections = await faceapi.detectAllFaces(img, new faceapi.SsdMobilenetv1Options({ minConfidence: 0.5 }));
  const out = faceapi.createCanvasFromMedia(img);
  faceapi.draw.drawDetections(out, detections);

  // Write detections to public folder
  fs.writeFileSync('public/last-detection.jpg', out.toBuffer('image/jpeg'));
  console.log('Detection saved.');
});

// Static route, give access to everything in the public folder
app.use(express.static('public'));
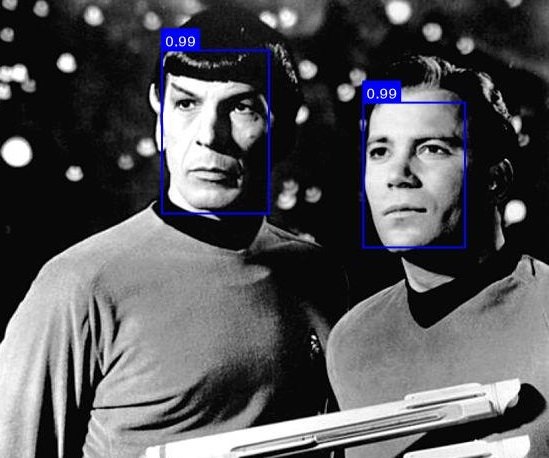
By running the server, setting CAMERA_URL to the snapshot of the camera, we can now detect faces. As an example, I ran the code on an image of crowd from Wikipedia. The result is shown below. The algorithm is quite capable of detecting almost all faces in even a single frame.

Face detection algorithm applied on image of Wikipedia (CC BY-SA).
Of course, were are not there yet. Detection is nice, but for presence, we also need to recognize faces. There are also some other things left to improve. For example:
- The current setup only detects faces, we still need to perform the recognition.
- The server only accepts a single camera, it would be nice to support multiple cameras. Of course, you can run an instance for each camera, but maybe it’s nice to combine them.
- When the face detection is running, the server cannot process other requests. A queue system could help with that.
- There is no security: I wouldn’t advise to run this on an unprotected network! We could add some basic authentication to protect the routes.
All of this will be covered in the next posts. To continue you can read part 2. For now, feel free to let me know what you thought in the comments. You can find the latest code in the Github repository, the code for this post is tagged v0.1.0.
Series on Home Automation
This post is part of a series of posts on Home Automation. These posts usually cover a part of my own smart home or a project I worked on. I make heavy use of Home Assistant, Node-RED and AppDaemon to control my home; these posts are examples of this.
Interested in my setup?
Home Automation hardware setupOther posts in this series
Interested in Home Automation, Home Assistant or Node-RED? I have a few other posts that might be of interest:
Home Automation / Home Assistant setup with recommended hardware: The four-year update
Overview of my current hardware for my smart home powered by Home Assistant. An update on my previous post of four years ago (!) when I had just started with home automation.
Automatically turn on tv when streaming to a Chromecast
Quick Node-RED tutorial on automatically turning on a TV when streaming media.
Automatic dark mode for Home Assistant
Quick tutorial on setting up an automatic dark mode for Home Assistant.


Elvin on
Hi Wouter,
Tried face recognition with facebox but liked your local approach more.
I tried to install your Dockerfile but my pi didn’t install it. Then i moved to my Synology docker to install it. After sending build context to the docker it fails ar 1TB data. Why is it so big? What’s going wron?
Thanks for you clear explanation.
Cheers Elvin