This is the second post of my series on face recognition for presence detection in Home Asssistant. In this series, I am investigating how to set up a face recognition system for my smart home that works locally, without the need for cloud services or internet access, and is fully controllable. In the first post I discussed requirements, possible alternatives and the first setup of a face detection system. In this second part, we are going to look at actually learning to detect faces. I will build upon the code written in part 1, so make sure to check that out first if you haven’t done so yet.
Note: This parts follows up on Part 1 so make sure to check that out first! All code for this second part can be found in the GitHub repository under tag v0.2.1.
Hardware requirements
The hardware used in this second part is the same as in part 1. Minimally, the face recognition system should have one camera and something that can run the algorithm. In my case, I use the following:
- Raspberry Pi 3B+ connected to a Raspberry Pi Camera. This is used as the main camera system. I use motionEyeOS as the OS on my Pi.
- An Intel NUC8i5BEK that will run the face recognition system (and also runs Home Assistant). See my post on my hardware setup for more information.
In the examples below, I will use a static image with faces, so technically, you can follow along without a working camera. Just point the CAMERA_URL environment variable to an image on your disk.

Overview of the face detection system. In this second part of the series we are focusing on the recognition part of the pipeline.
Collecting the training set
To recognize faces, we will need a training set with faces and associated labels. To store and load those images efficiently, I am using a single directory per person. Each directory can contain multiple images of the same person. In the Github repository of the face-api.js library you can find some sample images from the cast of the Big Bang Theory.
Example image used in this post. The end goal is to recognize all faces of the Big Bang Theory cast. Retrieved from: https://github.com/justadudewhohacks/face-api.js/
Training a face matcher
To recognize faces, we are using the FaceMatcher object that can match an unknown face to a database of face descriptors. Each descriptor is a list of numbers describing features of that face. By comparing two descriptors, we can check whether the faces are the same. To train this matcher, we need to generate descriptors of all faces in our training set. In this section, we will fill out the train function that creates this matcher object:
import faceapi from "face-api.js";

async function train() {
  // Train here

  // 1. Load required models
  // 2. Find all classes (persons)
  // 3. Create descriptors for each person

  return new faceapi.FaceMatcher(faceDescriptors);
}
First, we load all the required models from disk (weights are in the GitHub repository). This makes sure that all models are ready to use.
// 1. Load required models
await faceapi.nets.ssdMobilenetv1.loadFromDisk('weights');
await faceapi.nets.faceLandmark68Net.loadFromDisk('weights');
await faceapi.nets.faceRecognitionNet.loadFromDisk('weights');
When the models are loaded, we traverse the training directory to determine which persons we need to recognize. If you use the Dockerfile associated with this project or run the code directly, example images are in ./faces, you can override this directory by setting the FACES_DIR environment variable. If you use the example faces, the snippet below should find eight persons.
// 2. Find all classes (persons)
let trainingDir = './faces'; // Default directory in the docker image
if(process.env.FACES_DIR && fs.existsSync(process.env.FACES_DIR)) {
    console.info(`Loading training images from ${process.env.FACES_DIR}`)
    trainingDir = process.env.FACES_DIR;
}

// Traverse the training dir and get all classes (1 dir = 1 class)
const classes = fs.readdirSync(trainingDir, { withFileTypes: true })
    .filter(i => i.isDirectory())
    .map(i => i.name);
console.info(`Found ${classes.length} different persons to learn.`);
For each person directory, we now discover all images. There is no validation on the images, so make sure that there are no other files in the directories (or add some basic checks).
Each image is loaded, and face descriptors are computed. In this case, we assume each person-image is a cropped version of a single face (without any background). If the images would also contain background, we would have to run a face detection algorithm first to extract the face, increasing the overall training time. The descriptors are labeled with the class name (name of the directory). Later we will work on an automated method to create these training images.
const faceDescriptors = await Promise.all(classes.map(async className => {

    const images = fs.readdirSync(path.join(trainingDir, className), { withFileTypes: true })
        .filter(i => i.isFile())
        .map(i => path.join(trainingDir, className, i.name));

    // Load all images for this class and retrieve face descriptors
    const descriptors = await Promise.all(images.map(async path => {
        const img = await canvas.loadImage(path);
        return await faceapi.computeFaceDescriptor(img);
    }));

    return new faceapi.LabeledFaceDescriptors(className, descriptors);
}));
Recognizing faces
With our face matcher trained, we can try to recognize faces in new images. To do this, we extend the motion-detected route from part 1 of this series. Make sure to read that post for more background on how I use Express and Node.JS to set up this service.
The first step is to load the new image from the camera and compute descriptors for each face in the image. In these steps, we will use the same models we loaded in the train() function.
const img = await canvas.loadImage(process.env.CAMERA_URL);

const results = await faceapi
    .detectAllFaces(img)
    .withFaceLandmarks()
    .withFaceDescriptors();

console.info(`${results.length} faces detected`);
After the faces have been detected, we can compare the descriptors using the FaceMatcher. As in part 1, I save the last detection to disk so that we can view it later.
// Create canvas to save to disk
const out = faceapi.createCanvasFromMedia(img);

results.forEach(({detection, descriptor}) => {
    // See if the descriptor matches a face in our database
    const label = faceMatcher.findBestMatch(descriptor).toString();
    console.info(`Detected face: ${label}`);

    const drawBox = new faceapi.draw.DrawBox(detection.box, { label });
    drawBox.draw(out)
});

// Write detections to public folder
fs.writeFileSync('public/last-detection.jpg', out.toBuffer('image/jpeg'));
console.log('Detection saved.');
Combining all snippets, the full route is as follows:
app.get("/motion-detected", async (req, res) => {
    res.status(200).end();
    console.info("Motion detected");

    const img = await canvas.loadImage(process.env.CAMERA_URL);

    const results = await faceapi
        .detectAllFaces(img)
        .withFaceLandmarks()
        .withFaceDescriptors();

    console.info(`${results.length} faces detected`);

    // Create canvas to save to disk
    const out = faceapi.createCanvasFromMedia(img);

    results.forEach(({detection, descriptor}) => {
        const label = faceMatcher.findBestMatch(descriptor).toString();
        console.info(`Detected face: ${label}`);

        const drawBox = new faceapi.draw.DrawBox(detection.box, { label });
        drawBox.draw(out)
    });

    // Write detections to public folder
    fs.writeFileSync('public/last-detection.jpg', out.toBuffer('image/jpeg'));
    console.log('Detection saved.');
});
For testing, it can be helpful to directly show the recognized faces on screen, instead of saving them to disk. For this, we can make a new route under /recognize that directly shows the latest detection. To do this, we have to make use of createJPEGStream() which allows us to stream canvas data to the client’s browser. The content of this route is almost equal to the existing route, with the exception in saving the image.
app.get("/recognize", async (req, res) => {

    const img = await canvas.loadImage(process.env.CAMERA_URL);

    const results = await faceapi
        .detectAllFaces(img)
        .withFaceLandmarks()
        .withFaceDescriptors();

    console.info(`${results.length} face(s) detected`);

    // Create canvas to save to disk
    const out = faceapi.createCanvasFromMedia(img);
    results.forEach(({detection, descriptor}) => {
        const label = faceMatcher.findBestMatch(descriptor).toString();
        console.info(`Detected face: ${label}`);

        const drawBox = new faceapi.draw.DrawBox(detection.box, { label });
        drawBox.draw(out)
    });

    res.set('Content-Type', 'image/jpeg');
    out.createJPEGStream().pipe(res);

});
Starting the server
With all routes defined, we can start the Express server. Note that the train function we defined earlier is async. It has to perform several actions before we can start recognizing faces, including training the face matcher. If we started up the Express server without the actions completed, the face matcher would not be able to match any faces. Instead, we first run the train function and after it completes start the server:
let faceMatcher = null;

async function start() {

    console.info("Start training recognition model.")
    faceMatcher = await train();
    console.info("Finished training.");

    const PORT = process.env.PORT;

    // Start express on the defined port
    app.listen(PORT, () => console.log(`Server running on port ${PORT}`))
}

start();
If you start the server and run it on the example image, the algorithm should be able to detect all faces:
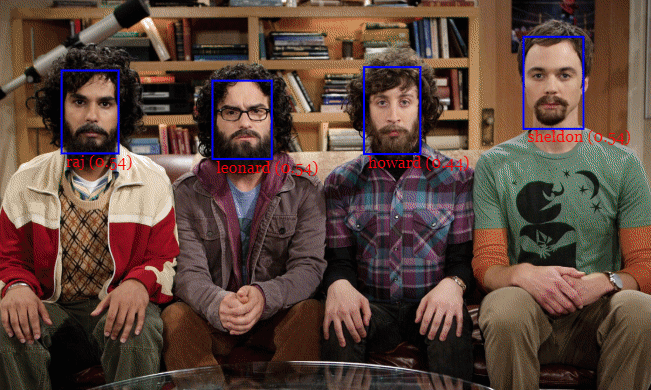
Recognized faces from the BBT cast. Source: https://justadudewhohacks.github.io/face-api.js/docs/index.html
To run the algorithm on your own face, you only have to create a new directory in the faces directory and add images of your own face. After restarting the server, the algorithm will pick these images up and should be able to recognize you. The console will output how many persons can be recognized.
Adding training images on the fly
Adding training images manually is quite cumbersome. Luckily, we can also add these semi-automatically! To do this we have to use two functions from the face-api.js library: 1) detectAllFaces to detect faces in a new image; and 2) extractFaces to get the face from the image. Combined, these functions first find all faces in an image and then for each face extract a training image in the correct size.
const results = await faceapi.detectAllFaces(img);
const faces = await faceapi.extractFaces(img, results);
The faces variable will contain small images of each face in the image. I made this functionality available through a new route /add-face/:name. Apart from the two functions above, this route adds some additional checks to see if a training image can be extracted. For example, if more than one face is detected we are not sure which face to extract so we should trigger an error. The same holds if no face was detected.
// Add a new training sample
app.get("/add-face/:name", async (req, res) => {
    // Load an image
    const img = await canvas.loadImage(process.env.CAMERA_URL);
    const name = req.params.name;

    // Check if the identifier of this person is a valid directory name (letters and numbers)
    if(!name.match(/^[0-9a-zA-Z]+$/)) {
        res.status(400)
            .send("Invalid name provided for training sample.")
            .end();
        return;
    }

    console.info(`Trying to detect new training sample for '${name}'.`)
    const results = await faceapi.detectAllFaces(img);

    // This route only works when there is one person in the image
    if(results.length > 1) {
        res.status(422)
            .send("Multiple faces detected in the image, cannot save training data.")
            .end();
        return;
    }

    if(results.length == 0) {
        res.status(422)
            .send("No faces detected in the image, cannot save training data.")
            .end();
        return;
    }

    const faces = await faceapi.extractFaces(img, results);

    // Check if this a new person
    // trainingDir should map to your training folder
    const outputDir = path.join(trainingDir, name);
    if(!fs.existsSync(outputDir)) {
        console.info(`Creating training dir for new person '${name}'.`);
        fs.mkdirSync(outputDir);
    }

    // Write detections to training folder
    fs.writeFileSync(path.join(outputDir, `${Date.now()}.jpg`), faces[0].toBuffer('image/jpeg'));
    console.info('New training sample saved.');
    res.status(200).send('OK');
});
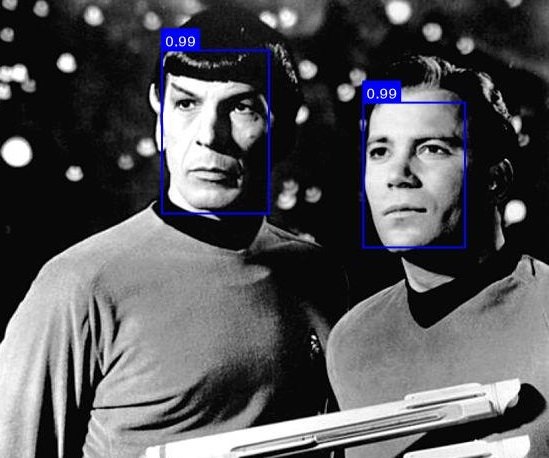
By calling this route you can add a new training image for a person. To illustrate this I applied the route to the following image of Spock:

Input image to extract a training image from. Adapted from https://commons.wikimedia.org/wiki/File:Leonard_Nimoy_William_Shatner_Star_Trek_1968.JPG.
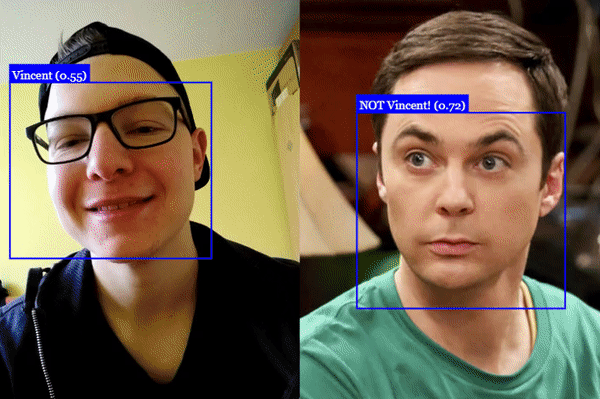
Now if you go to /add-face/spock, a new directory should be created with an extracted image of the face of Spock:

Extracted face of Spock. Adapted from https://commons.wikimedia.org/wiki/File:Leonard_Nimoy_William_Shatner_Star_Trek_1968.JPG.
After a server restart, the new training images are loaded and will be included in the FaceMatcher. To add yourself, go stand in front of your camera and call /add-face/your-name a few times in different positions. With a few training images the system should already be able to recognize you from now on!
Wrap up & next steps
Looking back at the TODO-list of part 1, the first item has now been addressed. We have also built a more efficient way of adding new training samples. The remainder of the items are more focussed on stability and further extending the usability of the system. The core functionality is present. In the future I will work on the Home Assistant integration and adding those extensions.
The current setup only detects faces, we still need to perform the recognition.We need a way of easily adding new training images, for example, when a user is not recognized.- The server only accepts a single camera; it would be nice to support multiple cameras. Of course, you can run an instance for each camera, but maybe it’s nice to combine them.
- When the face detection is running, the server cannot process other requests. A queue system could help with that.
- There is no security: I wouldn’t advise running this on an unprotected network! We could add some basic authentication to protect the routes.
For now, feel free to let me know what you thought in the comments. I am happy to hear any questions or remarks! You can find the latest code in the Github repository; the code for this post is tagged v0.2.1.
Series on Home Automation
This post is part of a series of posts on Home Automation. These posts usually cover a part of my own smart home or a project I worked on. I make heavy use of Home Assistant, Node-RED and AppDaemon to control my home; these posts are examples of this.
Interested in my setup?
Home Automation hardware setupOther posts in this series
Interested in Home Automation, Home Assistant or Node-RED? I have a few other posts that might be of interest:
Home Automation / Home Assistant setup with recommended hardware: The four-year update
Overview of my current hardware for my smart home powered by Home Assistant. An update on my previous post of four years ago (!) when I had just started with home automation.
Automatically turn on tv when streaming to a Chromecast
Quick Node-RED tutorial on automatically turning on a TV when streaming media.
Automatic dark mode for Home Assistant
Quick tutorial on setting up an automatic dark mode for Home Assistant.