
In a previous post I showed a wake-up light using Home Assistant and the default YAML configuration. In this post I’ll show my current setup which makes use of Node-RED.
As with my previous system, this wake-up light’s function is to light up my complete bedroom just before I need to wake up. The system works with any smart lamp that is compatible with HA, this includes Philips Hue and IKEA Tradfri lamps. I use it with a few GU10 bulbs (like the Hue GU10 lights). If you want you could even use some color-enabled bulbs to include a nice color transition mimicking a sun rise.
In this post I’ll show you how to build this system. The automation will be configurable (on/off, time) and has a switch to disable it on weekends.

The complete flow.
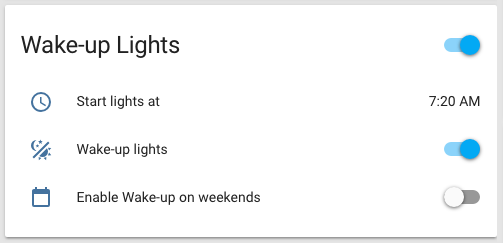
Dashboard widget of the Wake-up light component. All functions are configurable through the Home Assistant dashboard.
Example hardware
I’ve used the following components for my Wake-up light:
- Home Assistant and Node-RED running on a Raspberry 3B+ using Hass.io
- Conbee Zigbee hub; there is a USB version and a PI version. (More info here)
- Three GU10 Zigbee smart lights. I use 3 Innr GU10 lights(not available in the US) but you could also use something like the lights from Philips Hue.
These components are just an example. A minimum requirement is a device that runs Home Assistant and Node-RED, and a smart light that you can control.
My Home Automation hardware setup
Dashboard widget
For controlling the settings of the wake-up light I use the same widget as with my previous post. Please see that post if you would like to read more of the details.
The system requires three inputs:
- An
input_booleanto enable or disable the system. - A second
input_booleanto enable or disable the system on weekends. - A
input_datetimeto set the time of the wake-up light.
# configuration.yaml
input_boolean :
  wakeup_enabled:
    name: "Wake-up lights"
    initial: on
    icon: mdi:theme-light-dark
  wakeup_weekend:
    name: "Enable Wake-up on weekends"
    initial: off # I disable the system on default on weekends
    icon: mdi:calendar-blank

input_datetime:
  wakeup_time:
    name: "Start lights at"
    has_time: true
    has_date: false
    initial: "07:20"
Note: If you want to persist the values between restarts of Home Assistant remove the ‘initial’ value from the configuration.
The controls can be combined in a single view (or you can do this through the Lovelace ui editor):
# groups.yaml
alarm_clock:
  name: "Wake-up Lights"
  entities: # Add all entities here that should be part of the widget
    - input_datetime.wakeup_time
    - input_boolean.wakeup_enabled
    - input_boolean.wakeup_weekend
Building the flow
Scheduling
The first step in our flow is reading the wakeup_time from Home Assistant. This time is then passed on to a schedex node. The schedex node is a easy-to-use node to start something at a configurable time. An alternative is BigTimer but for something simple as this I prefer schedex. The schedex node sends a message at a specific time that can be configured. This perfectly matches our requirements as we would like to start the wake-up light at a configurable time (without changing the flow each time the time changes).

The most important node of the flow: schedex
To configure the schedex trigger, we have to send a payload with the new time to the schedex node when the wake-up time changes in Home Assistant. Schedex requires a specific payload format so I use simple function node (the parse time node in the image) to map the data from Home Assistant tot he correct format:
new_msg = {
    payload: {
        ontime: msg.payload.substr(0,5),
        offtime: msg.payload.substr(0,5)
    }
}
return new_msg;

Triggering the wake-up light is done using a schedex node.
These three nodes make sure that: 1) each time we change the wake-up time in HA the schedex node is updated and 2) the schedex node triggers a message at the configured time.
The configuration of the schedex node can be used to set some default values. I let the node send an ‘off’ message 60 minutes after the wake-up time started; you could use such an off message to run some additional automations.
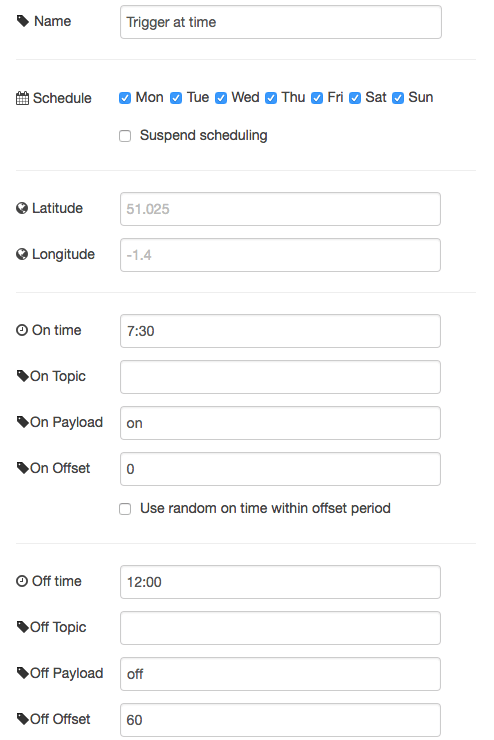
Default values for the schedex node
Enable/disable the wake-up light
The wake-up light can be disabled or only enabled on week days. To implement these requirements we add a filter after the schedex node that checks if the requirements are met.
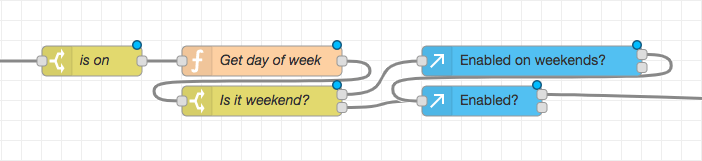
When schedex triggers an event we still need to check whether the wakeup light is enabled. This can be done by using a few nodes in series.
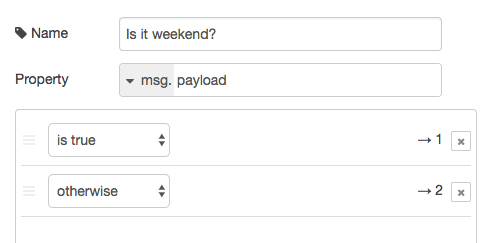
To implement this filter I make use of a function node that uses Javascript to get the day of the week. The node returns true as the payload if the current day is a weekend day. In Javascript ‘6’ is a Saturday and Sunday ‘0’.
// Contents of the "Day of the week" function node
var day = new Date().getDay();

var isWeekend = (day === 6) || (day === 0);

return {
    payload: isWeekend,
};

Configuration of the function node using the javascript snippet.
The output of the function node can then be routed using a switch node:
Switch node to route the output of the weekend-node.
Controlling the lights
The last step is to connect the output of the “Enabled?” node to a sequence that controls the lights. You can go wild here and create something based on the light setup in your bedroom. In my case I start the lights at 1% brightness and then slowly increase the brightness for 30 minutes. After 30 minutes, when all the lights are at max brightness, it further sets my home to a ‘morning’ state and turns on lights in other parts of the house.
In my example I use a template node to slowly increase the brightness of the lights:
{{ [250, state_attr('light.bedroom', 'brightness') + 9] | min }}
Complete flow and source code
Connecting all components and my light control nodes results in the complete flow as shown below:
The complete flow controlling my wake-up light using Node-RED.
To get started with this setup you can use the json source code of my nodes and customize them to fit your needs. At a minimum you need to change the entities of the lights that you would like to control.
Source code of nodes used in this post
[{"id":"d228445d.4259f8","type":"function","z":"556ecca6.827b14","name":"Get day of week","func":"var day = new Date().getDay();\n\nvar isWeekend = (day === 6) || (day === 0); \n\nreturn {\n payload: isWeekend,\n};","outputs":1,"noerr":0,"x":260,"y":1420,"wires":[["ba532104.74a48"]]},{"id":"ba532104.74a48","type":"switch","z":"556ecca6.827b14","name":"Is it weekend?","property":"payload","propertyType":"msg","rules":[{"t":"true"},{"t":"else"}],"checkall":"true","repair":false,"outputs":2,"x":260,"y":1460,"wires":[["e7a99d1f.bdef"],["e25ce15f.614ee"]]},{"id":"e7a99d1f.bdef","type":"api-current-state","z":"556ecca6.827b14","name":"Enabled on weekends?","server":"161bb087.35566f","halt_if":"off","halt_if_type":"str","halt_if_compare":"is","override_topic":true,"override_payload":true,"override_data":true,"entity_id":"input_boolean.wakeup_weekend","state_type":"str","outputs":2,"x":530,"y":1420,"wires":[["e25ce15f.614ee"],[]]},{"id":"e25ce15f.614ee","type":"api-current-state","z":"556ecca6.827b14","name":"Enabled?","server":"161bb087.35566f","halt_if":"off","halt_if_type":"str","halt_if_compare":"is","override_topic":true,"override_payload":true,"override_data":true,"entity_id":"input_boolean.wakeup_enabled","state_type":"str","outputs":2,"x":480,"y":1460,"wires":[["7db42b.e3de6bd4"],[]]},{"id":"7db42b.e3de6bd4","type":"api-call-service","z":"556ecca6.827b14","name":"1%","server":"161bb087.35566f","service_domain":"light","service":"turn_on","data":"{\"entity_id\":\"light.bedroom\",\"brightness\":1}","render_data":false,"mergecontext":"","output_location":"payload","output_location_type":"msg","x":230,"y":1600,"wires":[["5f30d3cb.1aadac"]]},{"id":"5f30d3cb.1aadac","type":"looptimer","z":"556ecca6.827b14","duration":"1","units":"Minute","maxloops":"30","maxtimeout":"35","maxtimeoutunits":"Minute","name":"","x":300,"y":1640,"wires":[["de710702.9a2d98"],[]]},{"id":"de710702.9a2d98","type":"api-render-template","z":"556ecca6.827b14","name":"Get new light setting","server":"161bb087.35566f","template":"{{ [250, state_attr('light.bedroom', 'brightness') + 9] | min }}","x":360,"y":1680,"wires":[["3df7037a.2f373c"]]},{"id":"3df7037a.2f373c","type":"api-call-service","z":"556ecca6.827b14","name":"Increase light","server":"161bb087.35566f","service_domain":"light","service":"turn_on","data":"{\"entity_id\":\"light.bedroom\",\"brightness\":\"{{ payload }}\"}","render_data":true,"mergecontext":"","output_location":"payload","output_location_type":"msg","x":370,"y":1720,"wires":[[]]},{"id":"df372079.83747","type":"server-state-changed","z":"556ecca6.827b14","name":"Wake up time input","server":"161bb087.35566f","entityidfilter":"input_datetime.wakeup_time","entityidfiltertype":"substring","outputinitially":true,"state_type":"str","haltifstate":"","halt_if_type":"","halt_if_compare":"is","outputs":1,"x":230,"y":1200,"wires":[["47ca214a.cd1c1"]]},{"id":"47ca214a.cd1c1","type":"function","z":"556ecca6.827b14","name":"Parse time","func":"new_msg = {\n payload: {\n ontime: msg.payload.substr(0,5),\n offtime: msg.payload.substr(0,5)\n }\n}\nreturn new_msg;","outputs":1,"noerr":0,"x":250,"y":1280,"wires":[["cfe7b8ae.660428"]]},{"id":"cfe7b8ae.660428","type":"schedex","z":"556ecca6.827b14","name":"Trigger at time","suspended":false,"lat":"","lon":"","ontime":"7:30","ontopic":"","onpayload":"on","onoffset":0,"onrandomoffset":0,"offtime":"12:00","offtopic":"","offpayload":"off","offoffset":"60","offrandomoffset":0,"mon":true,"tue":true,"wed":true,"thu":true,"fri":true,"sat":true,"sun":true,"x":440,"y":1280,"wires":[["b361dc76.e4a18"]]},{"id":"b361dc76.e4a18","type":"switch","z":"556ecca6.827b14","name":"is on","property":"payload","propertyType":"msg","rules":[{"t":"eq","v":"on","vt":"str"}],"checkall":"true","repair":false,"outputs":1,"x":590,"y":1280,"wires":[["d228445d.4259f8"]]},{"id":"235e234a.7b2aac","type":"comment","z":"556ecca6.827b14","name":"Time setting input","info":"","x":230,"y":1160,"wires":[]},{"id":"b938cf54.1bdd3","type":"comment","z":"556ecca6.827b14","name":"Trigger at the configured time","info":"","x":480,"y":1240,"wires":[]},{"id":"5a93ca40.9dd574","type":"comment","z":"556ecca6.827b14","name":"Check if the wake-up light should be enabled on this day of the week","info":"","x":390,"y":1360,"wires":[]},{"id":"e34ba2ee.19df8","type":"comment","z":"556ecca6.827b14","name":"Run the wake-up sequence","info":"","x":260,"y":1520,"wires":[]},{"id":"161bb087.35566f","type":"server","z":"","name":"Home Assistant"}]
Questions? Feedback? Feel free to add them to the comments of this post.
Series on Home Automation
This post is part of a series of posts on Home Automation. These posts usually cover a part of my own smart home or a project I worked on. I make heavy use of Home Assistant, Node-RED and AppDaemon to control my home; these posts are examples of this.
Interested in my setup?
Home Automation hardware setupOther posts in this series
Interested in Home Automation, Home Assistant or Node-RED? I have a few other posts that might be of interest:
Home Automation / Home Assistant setup with recommended hardware: The four-year update
Overview of my current hardware for my smart home powered by Home Assistant. An update on my previous post of four years ago (!) when I had just started with home automation.
Automatically turn on tv when streaming to a Chromecast
Quick Node-RED tutorial on automatically turning on a TV when streaming media.
Automatic dark mode for Home Assistant
Quick tutorial on setting up an automatic dark mode for Home Assistant.


Mike on